
A few weeks ago there was some discussion in a previous continuous beam post about how to analyse a continuous beam with specified deflections at the supports. In this post I will look at three different ways of doing this with the current version of the ConbeamU spreadsheet, and in the next I will publish a new version that includes functions to do the job automatically. The examples included in this post can be downloaded (including full open source code) from: Conbeam-Support Disp.zip
Probably the simplest approach is to use the Excel Solver to adjust the beam model to achieve the desired displacements at the supports. The procedure in outline is:
- Set up a single cell with a formula that will act as a single target value for solver.
- Select a range (or separate cells) containing values that Solver will adjust to reach its goal.
- Enter starting values in this range.
- Open the Solver dialog, specify the required inputs (including any constraints) and run the Solver.
The first screenshot below shows this process with a three span beam, with cantilevers at each end, and specified displacements at each support. In this example I have adjusted the support stiffness to get the required displacements (click on any image for a full size view):

This example uses the ConBeamU User Defined Function (UDF) to find the beam deflections (also shear forces and moments) for the beam defined under “Beam Segments” and “Supports”, when subject to the specified Distributed Loads and Point Loads. Tne main function output is in columns K to N (hidden by the Solver Dialog box), but the deflections at the four supports are extracted with simple formulas in cells K4:K7. The required deflections are entered in cells J4:J7, and the difference of these two values squared is in L4:L7. The difference is squared because this will always give a positive value. In this case the ConBeamU function has been set up to return deflections in mm, but care must be taken to ensure consistent units. The Solver target value (or “Objective”) in Cell L8 is the sum of the 4 values in L4:L7.
in the Solver Dialog:
- The Objective is specified as the value in L8
- This value is to be set to a value of 0
- The values to be adjusted to achieve this target are in the range F6:F9
- Each of these values must be greater than zero, because zero or negative values will be treated as a rigid support by the ConBeamU function.
Having set up the Solver, click the Solve button, and the values in F6:F9 will be adjusted until L8 is very close to zero, as shown above.
The second example also uses the Solver, but in this case I have set the support stiffness values to a fixed (arbitrary) value, and created an artificial point load at each support:
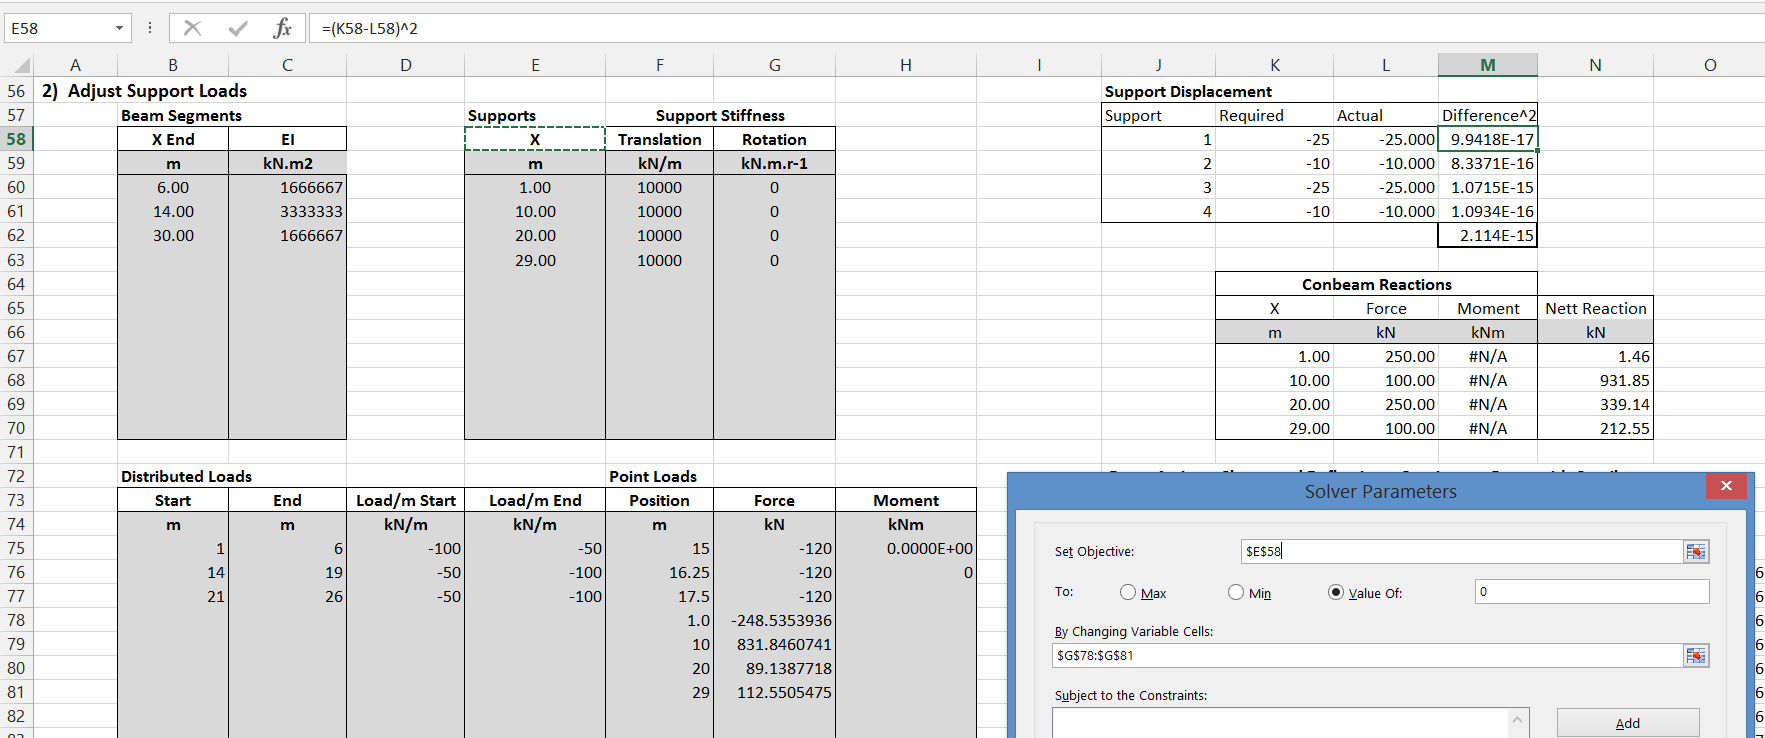
The set-up is the same as for the previous example except that:
- The “By Changing Variable Cells” range is now the values of the four additional point loads in G78:G81
- The constraints to keep all variable values greater than zero are no longer required.
- This procedure generates the correct shear forces, moments and deflections, because the artificial loads are applied directly to the supports, but to find the correct reactions the applied support loads must be added to the calculated reactions.
It can be seen (column N) that this method finds exactly the same Nett Reaction forces as the first example.
A similar approach, that does not require the use of the Solver, is to make the stiffness of the supports very much greater than the stiffness of the beam, and apply very large vertical point loads at the support positions:
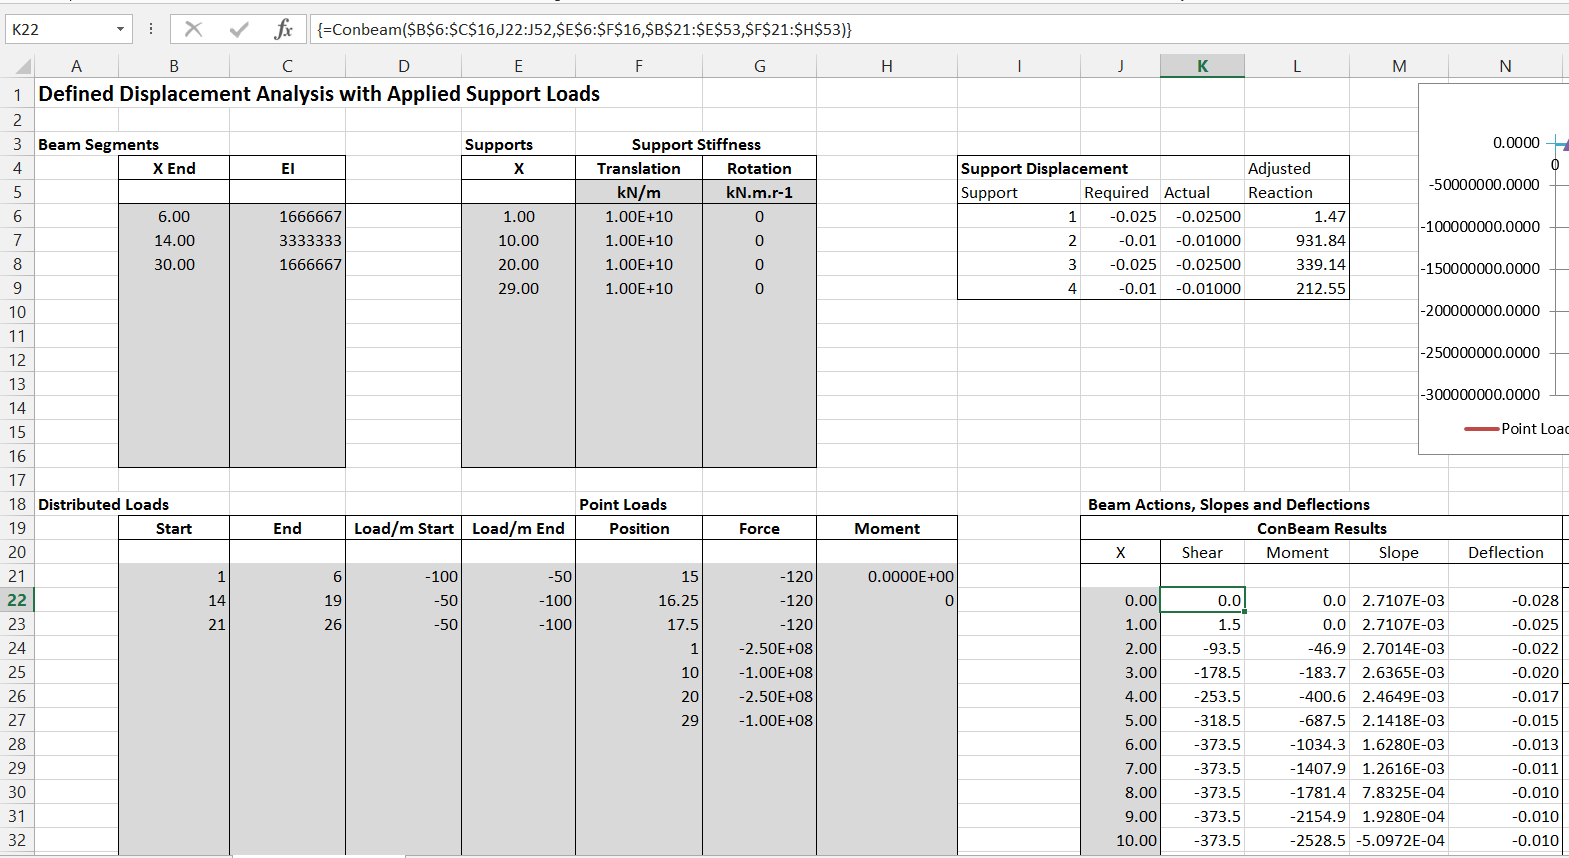
In the example shown above I have used the ConBeam UDF, which is not unit aware, so deflections are now in metres. The support stiffness has been set to 1E10 kN/m, and the artificial point loads are 1E10 x required deflection in m (Range G24:G27). The deflections are calculated immediately, and are a very close approximation to the required values (the maximum error is of the order of 1E-7 m).
To achieve this order of accuracy the stiffness of the supports must be chosen carefully. If it is too low the relative beam stiffness will affect the results, but if it is too high round-off error has a significant effect. The best value for any given beam can be found easily by trial and error.
The final method takes longer to set up, but is easily automated and is the one that has been incorporated in the new version of the spreadsheet. The procedure used in this approach is:
- The SSSpanU UDF is used to calculate the beam deflection under the specified (real)loading when supported by the end supports only.
- Upward unit loads are applied separately at each internal support, and a flexibility matrix is set up showing the deflection at each node position due to each unit load.
- The flexibility matrix is inverted to yield a stiffness matrix.
- The stiffness matrix is multiplied by the deflection required at each internal node to return the single span deflections to the specified support deflection.
- The resulting values are the internal reaction loads, that may be applied in conjunction with the real applied loads to determine the resultant loads and deflections of the beam.

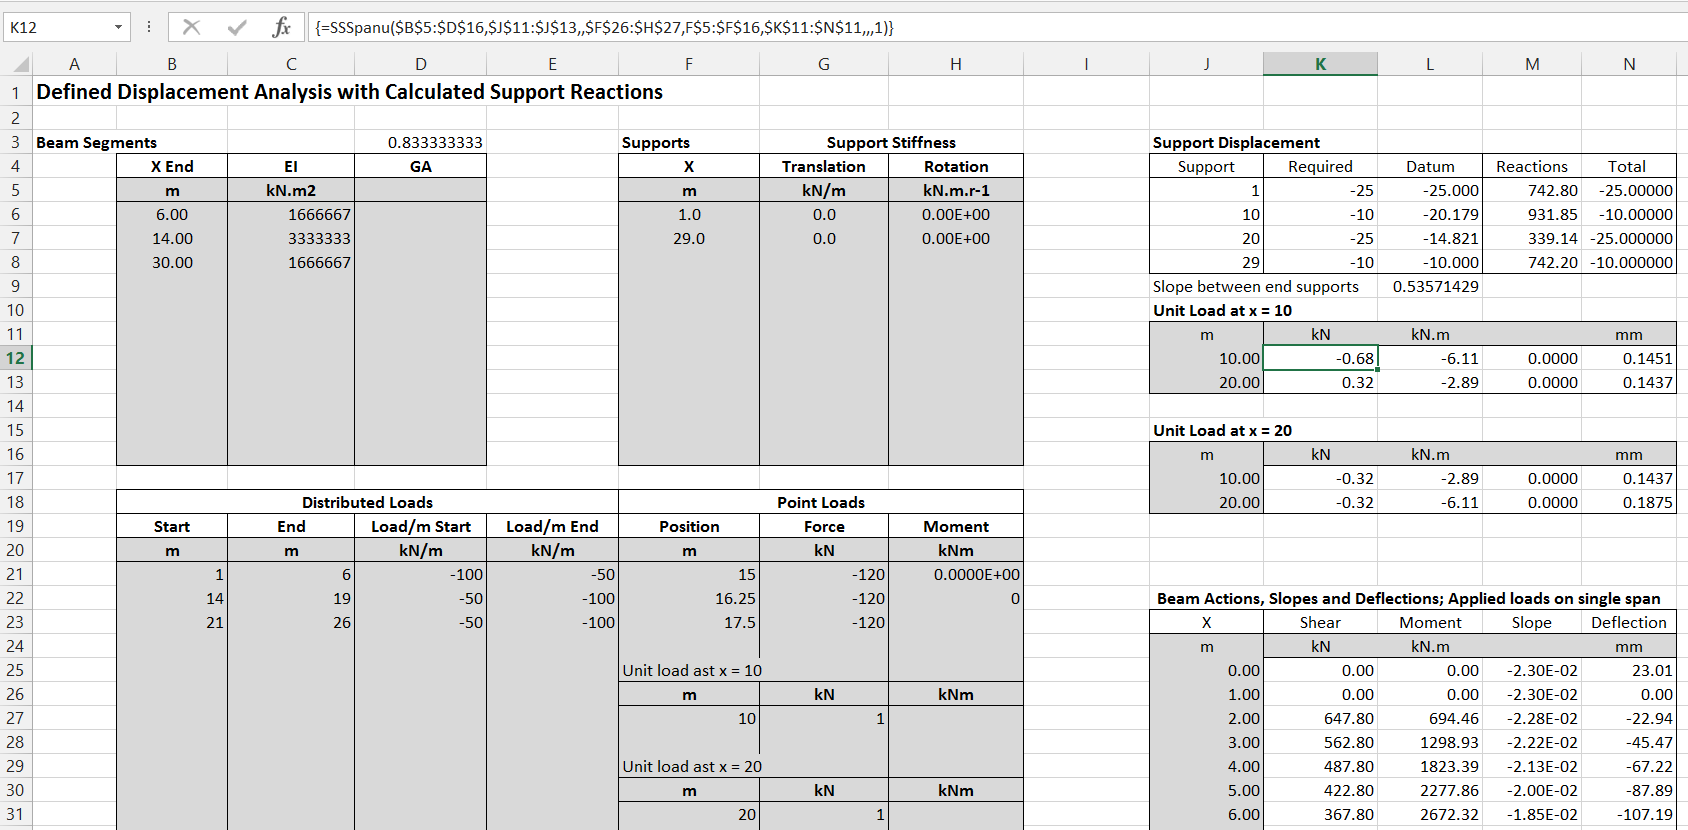
The screenshot above shows the input and results for the three initial calculations:
- The end supports are defined in range F5:G7, and the real applied loading is in ranges B20:E23 (distributed loads) and F20:H23 (point loads).
- The resulting beam actions and deflections for the single span are in range K24:N55
- The applied unit loads at the internal supports are in ranges F26:H27 and F30:H31, and the resulting output at the internal nodes is in ranges K11:N12 and K17:N18.
The final stage of the calculations is shown in the screenshot below:
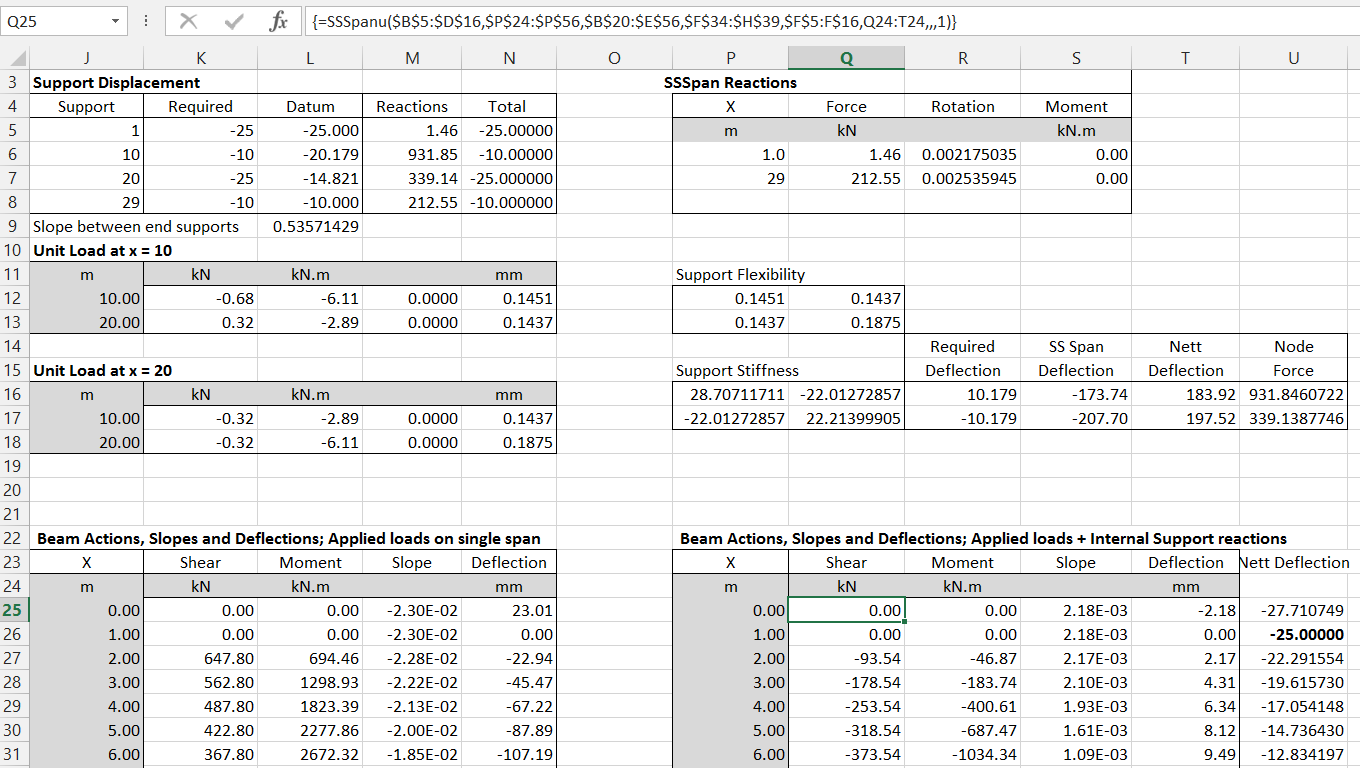
- The support flexibility matrix is in P12:Q13, being the node deflections from cells, N12, N13 and N17 and N18.
- This matrix is inverted in range P16:Q17, using the MInverse function, to generate the support stiffness matrix.
- This matrix is then multiplied (using the MMult function) by the required beam deflections to find the support reaction at each internal support. Note that the required settlements are measured from a datum line between the end supports after settlement. The settlement of the Datum is shown in L5:L8, and the resulting required deflections at the internal supports at R16:R17.
- The internal support reactions are then applied together with the original loading in a single span analysis, with output in range Q25: T55.
- Finally the deflections must be adjusted for the deflection of the end nodes, as shown in Column U. The final reactions and deflections at the supports are also transferred to M5:N8.
The results of the three different analysis methods, applied to a beam with the same loading and specified deflections, are shown in the graphs below, showing virtually identical results from each analysis.


Pingback: ConbeamU Update; defined support deflections | Newton Excel Bach, not (just) an Excel Blog