Reinforced Concrete – ULS capacity under combined axial load and biaxial bending

I have modified the ULS Design Functions spreadsheet, last presented here, to analyse sections subject to bi-axial bending, and non-symmetrical sections.  The new version makes use of the routines for splitting any section defined by XY coordinates into trapezoidal layers, described here.  The new version (ULS Design Functions-biax.xlsb) has been added to the zip file along with the previous version, and can be downloaded from ULS Design Functions.zip, including full open source code.

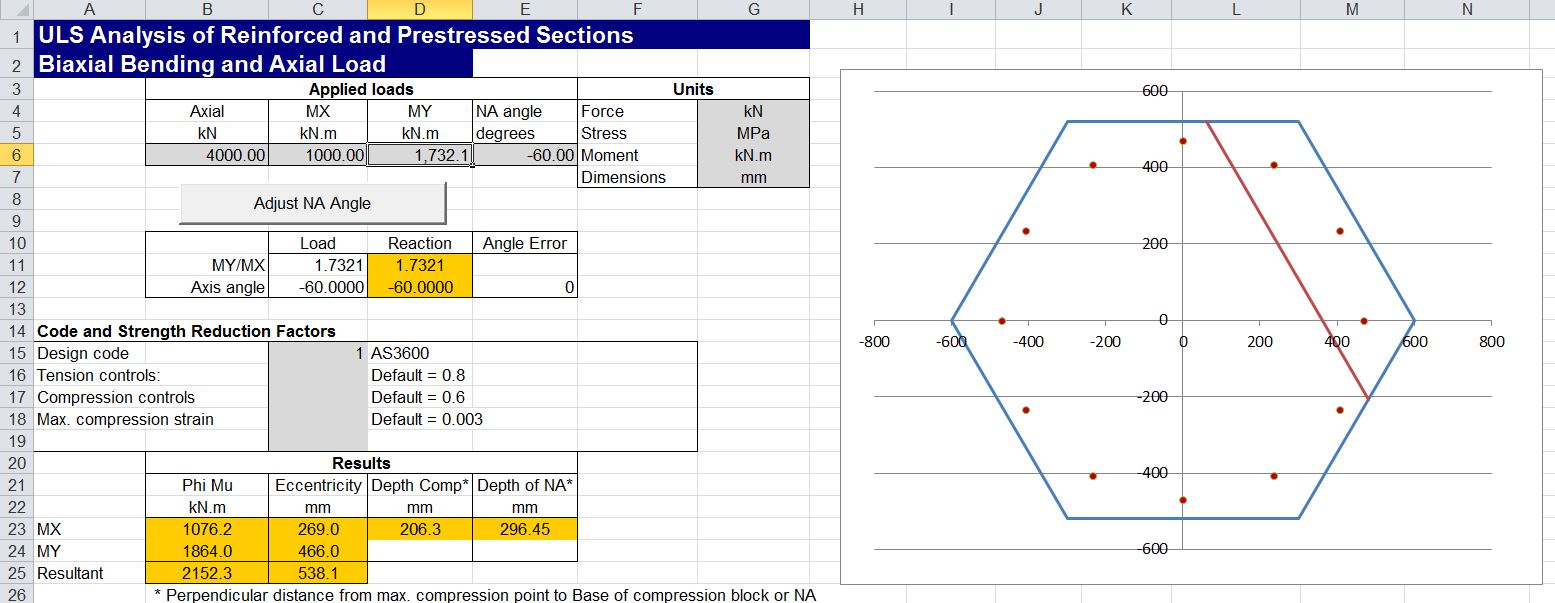
Input and results for a wide rectangular section, subject to bi-axial bending and axial load, are shown in the screenshot below:

Biax-1

The direction of the applied moment is defined by MX and MY, then the Neutral Axis angle is adjusted so that the reaction force and moments are in equilibrium with the applied loads, by clicking the “Adjust NA Angle” button.

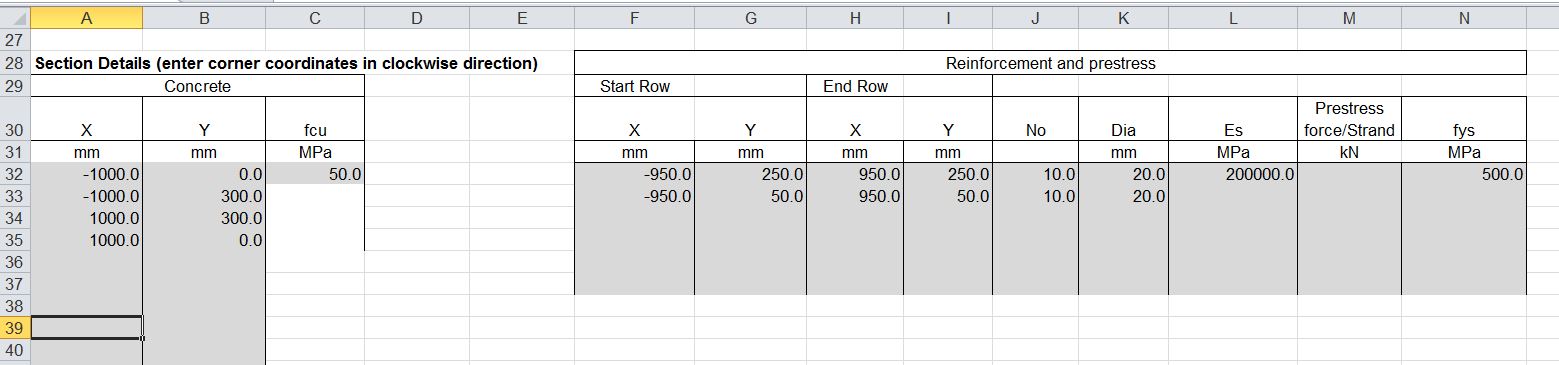
The concrete section is defined by XY coordinates of each corner, listed in a clockwise direction, and the reinforcement is defined in layers, by entering the coordinates of the start and end of each layer:  For each layer the number of bars and bar diameter are defined, together with the steel properties for the first layer, and any subsequent layer with different properties.  It is also possible to specify a prestress force for any layer.

Biax-2

The hexagonal section shown below demonstrates that for a symmetrical section the angle of the resultant moment axis is parallel to the Neutral Axis angle, as would be expected:
Biax-3

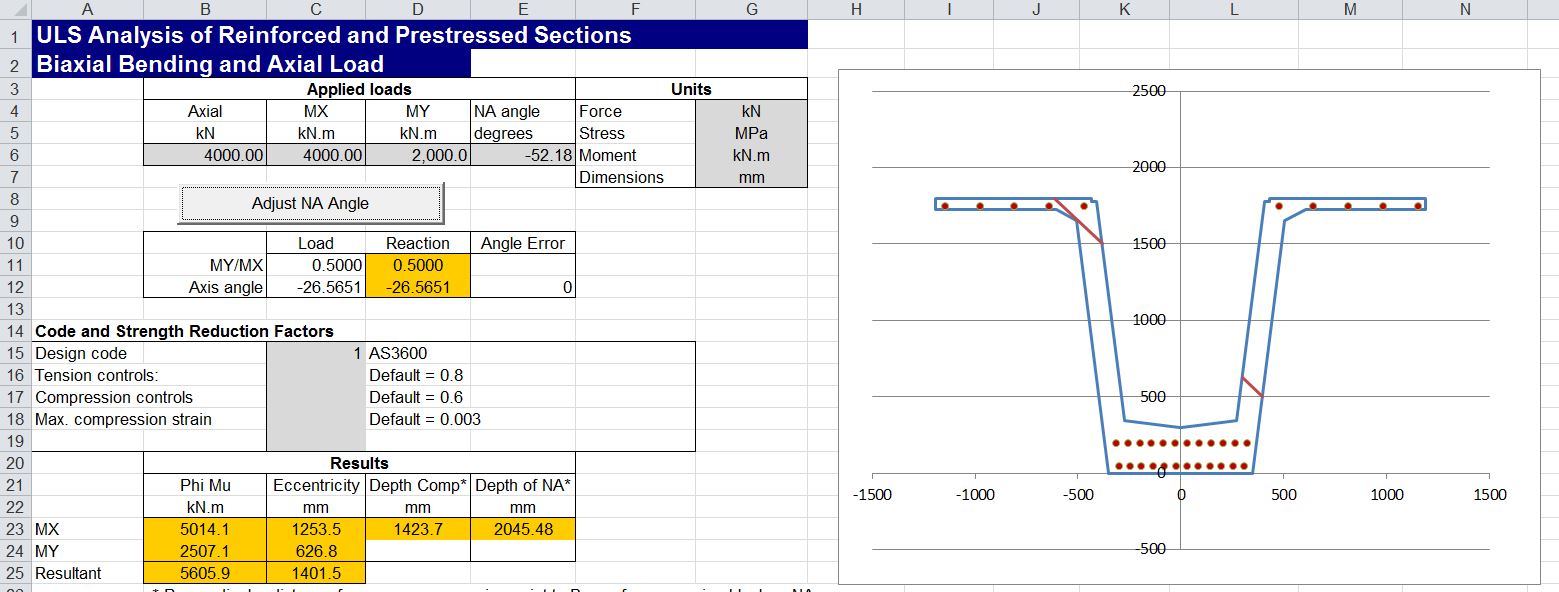
It is possible to define any complex shape, such as the precast Super-T bridge girder shown below:
Biax-T1

It is also possible to define shapes with internal voids, as shown below, by listing the corners of the void in the anti-clockwise direction.  In this case the line must be continuous from start to end, and the connection between the outer line and the void must be made with two separate lines, with a very small separation, so that separate lines do not overlap or cross at any point.  See the example in the download file for more details.
Biax-T2

More detailed output data is provided on the “UMom Out” sheet, in a similar format to the earlier version.
Biax-6

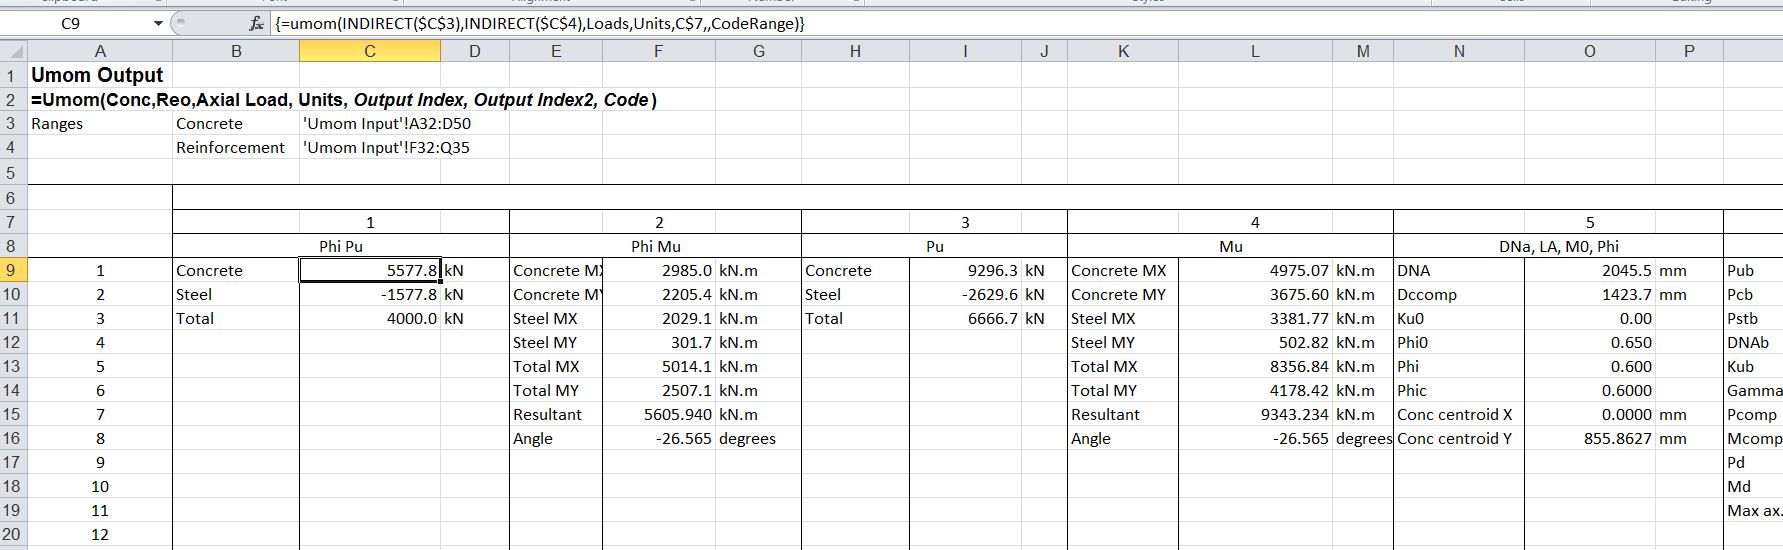
The analysis is carried out by two user defined functions (UDFs), UMom and UMomA.  UMom provides the detailed output shown above for a single set of applied loads.  UMomA returns any one of the available output values for a range of applied axial loads, and a single value or range of Neutral Axis directions.  Both functions return an array of values, and must be entered as an array function, as described at Using Array Functions and UDFs.

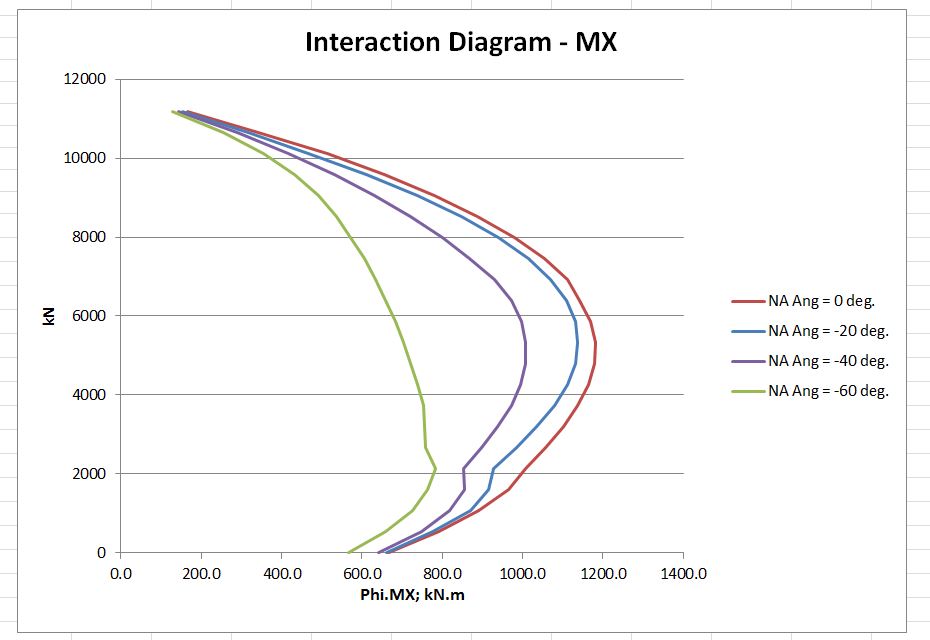
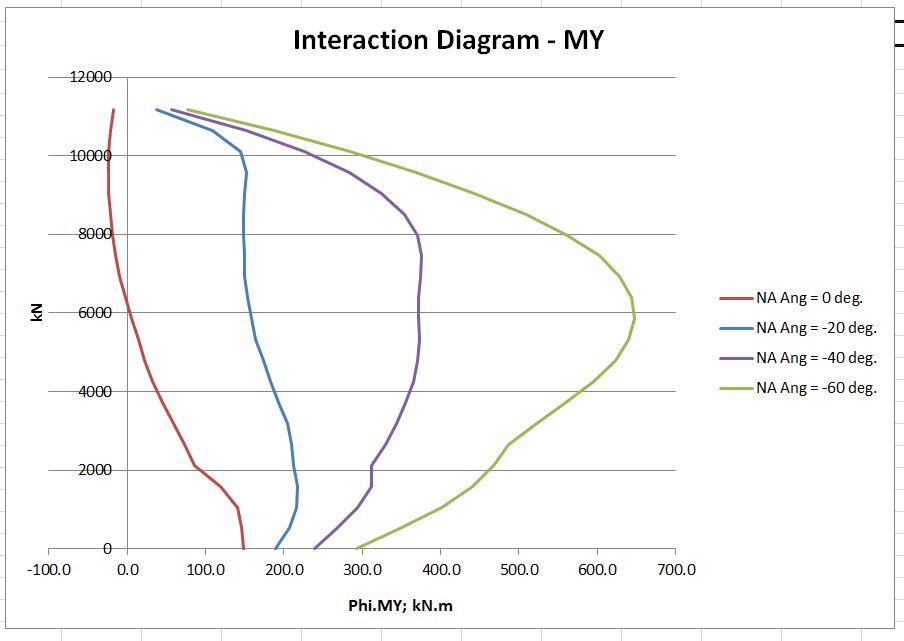
Use of the UMomA function allows the rapid generation of interaction diagrams, as shown in the screenshots below:
Biax-7


Biax-8

Posted in Beam Bending, Concrete, Excel, Newton, UDFs, VBA | Tagged , , , , , , | 13 Comments

Melanie Safka

Melanie Safka is touring Australia this month, which prompted me to look up some of her old songs on YouTube – I’d forgotten how good she was:

And something more recent, London in 2009:


Posted in Bach | Tagged | 1 Comment

Data Transfer to Python – Update

As noted in the comments here, the main bottleneck in the Python matrix solver functions presented recently was not in the data transfer from Excel, but rather in the creation of the Numpy arrays for very long lists of short lists (see this Stackoverflow thread for more details of the background).  It seems there is a substantial time saving in converting the long array into 1D vectors, which can be converted into Numpy arrays very much more quickly.  The VBA code below converts a 3D array of any length (up to the maximum allowed in Excel) to 3 vectors.

Function Vectorize(x As Variant, x_1 As Variant, x_2 As Variant, x_3 As Variant) As Long
Dim nr As Long

nr = x.Rows.Count
x_1 = x.Resize(nr, 1).Value2
x_2 = x.Offset(0, 1).Resize(nr, 1).Value2
x_3 = x.Offset(0, 2).Resize(nr, 1).Value2
Vectorize = nr
End Function

To transfer these vectors to Python, via ExcelPython, the PyObj function must be used:

Set x = Range("SSA")  ' Excel range with 500500 rows and 3 columns
n = Vectorize(x, x_1, x_2, x_3) 'Convert range values to 3 vectors
' Create ExcelPython objects for transfer to Python
Set x_1 = PyObj(x_1, 1)
Set x_2 = PyObj(x_2, 1)
Set x_3 = PyObj(x_3, 1)

In Python the three vectors are converted to Numpy arrays:

def xl_getnpvect(x_1, x_2, x_3):
    timea = np.zeros(4)
    timea[0] = time.clock()
    x_1 = np.array(x_1)
    timea[1] = time.clock()
    x_2 = np.array(x_2)
    timea[2] = time.clock()
    x_3 = np.array(x_3)
    timea[3] = time.clock()
    return timea.tolist()

The table below compares the data transfer and conversion times using this method on an Excel range of 500500 rows x 3 columns, with the same operation using a 2D variant array.

XLpyMatrix3-0

The times for solution of a large sparse matrix system (10945×10945 matrix), using the new vector transfer routine, are shown below:
XLpyMatrix3-1

The data transfer and array creation times are now a relatively small proportion of the total solution time, even for the iterative solver with a solve time of only 0.28 seconds.

Posted in Arrays, Excel, Frame Analysis, Link to Python, NumPy and SciPy, VBA | Tagged , , , , , | 4 Comments

Two Timers

The simplest way to check the execution time of VBA code is with the built in Timer function, but this returns a single precision value in seconds, resulting in a minimum time step of about 10 milliseconds.  For VBA code much better precision can be achieved with the Microtimer function, found at a Microsoft article by Charles Williams:

Private Declare Function getFrequency Lib "kernel32" _
Alias "QueryPerformanceFrequency" (cyFrequency As Currency) As Long
Private Declare Function getTickCount Lib "kernel32" _
Alias "QueryPerformanceCounter" (cyTickCount As Currency) As Long
Function MicroTimer() As Double
'

' Returns seconds.
Dim cyTicks1 As Currency
Static cyFrequency As Currency
'
MicroTimer = 0

' Get frequency.
If cyFrequency = 0 Then getFrequency cyFrequency

' Get ticks.
getTickCount cyTicks1

' Seconds
If cyFrequency Then MicroTimer = cyTicks1 / cyFrequency
End Function

For use with Python code, called from VBA, the code below will call the Python time.clock function, allowing the VBA and Python code to be timed on the same basis:

Function xl_pytime()
Dim result As Variant, Res As Variant
Static methods As Variant

On Error GoTo fail:

    Set methods = PyModule("timesum", AddPath:=Path1)
    Set result = PyCall(methods, "xl_getpytime1", PyTuple())

    Res = PyVar(result)
    xl_pytime = Res
    Exit Function

fail:
    xl_pytime = Err.Description

End Function

Public Function Path1() As String
Dim pyPath1 As Variant
    If pyPath1 = vbNullString Then pyPath1 = ThisWorkbook.Path
    Path1 = pyPath1
End Function

The Python code is simply:

def xl_getpytime1():
    return time.clock()

These two timers are included in the spreadsheet Timers.xlsb, together with a routine to sum 7 sequences of integers from 1 to 10 up to 1 to 10,000,000. The results for the two timers, compared with the VBA Timer function are shown below.

Also included are times for the sum routine in Python, using pure Python code, and with the addition of the Numba just-in-time compiler for the sum loop. Note that the Python code is about 4 times slower than the VBA, but with the addition of the Numba compiler it is about 20 times faster.  Also note that the Python timer, when called from VBA, has a lag of about 0.5 milliseconds, so the Microtimer is preferable for code all in VBA.

TwoTimers


Posted in Excel, Link to Python, VBA | Tagged , , , , | 2 Comments

Feet and inches, and other units

Following a query at Eng-tips I have had a look at options in Excel for converting metres to feet and inches, with the inches displayed as a fraction rather than a decimal.

Converting from metres to feet or inches is straightforward (with a length in metres in C3):

=CONVERT($C$3,”m”,”ft”) or  =CONVERT($C$3,”m”,”in”)

or just:  =C3/0.3048 or  =C3/0.0254

To display the resulting value as a fraction, the cell may be formatted to display fractions, or the same result may be achieved with the text function, which also allows the string to be terminated with the ‘ or ” symbol:

=TEXT($C$3/0.0254, “# #/16”)&CHAR(34)

The number following the ##/ is the denominator for the fraction, which may be entered explicitly, or read from another cell:

=TEXT($C$3/0.0254, “# #/”&D13)&CHAR(34)

To display the result in feet and inches is not so straightforward.  The simplest method I found came from: http://excel-formulas.blogspot.com.au/2009/07/display-feet-and-inches-as-5-8-12.html

To convert from decimal feet to feet and fractional inches:

=INT($C$5)&”‘ “&TEXT(12*($C$5-INT($C$5)),”#/16″)&CHAR(34)

or for metres to feet and fractional inches:

=INT(CONVERT($C$3,”m”,”ft”))&”‘ “&TEXT(12*(CONVERT($C$3,”m”,”ft”)-INT(CONVERT($C$3,”m”,”ft”))),”# #/16″)&CHAR(34)

Alternatively, a short User Defined Function (UDF) will give the same result with:

=M2Ftinf($C$3,16)

These formulas, and 4 UDFs (converting to inches or feet and inches, and in the opposite direction) are included in the download file: M2ft-in.xlsb:

Metres to feet and fractional inches

Metres to feet and fractional inches

On-sheet formulas for conversion in the other direction would be still more complex, but the UDFs provide this functionality.

Feet and inches to metres

Feet and inches to metres

The four UDFs have also been added to the Units4Excel spreadsheet, which also provides functions for conversion between a wide range of other units, and units aware evaluation of functions entered as text.  The spreadsheets (including full open-source code) may be downloaded from Units4Excel.zip


Posted in Excel, Maths, Newton, UDFs, VBA | Tagged , , , , , | 1 Comment