
Following a recent comment, this post looks at setting up a user defined function (UDF) on a blank worksheet, using the ConBeamU function as an example.
To use a UDF, the VBA code for the function must either be included in the active workbook, or another open file. In most cases the VBA code can be copied from the master file to a new workbook, but in the case of the ConbeamU function the units related code refers to a database of units data in the master file. The easiest way to set up a new file for this case is to save the master file with a new name, and delete all the unwanted sheets. I have added a ConbeamU-template file to the ConbeamU zip file, that has all the required code and units data, two sheets with notes and instructions, and a single blank sheet. The new zip file can be downloaded from:
ConbeamU.zip
The screen shots below illustrate how to set up a new application of the ConbeamU function, starting from a blank worksheet.
First copy details of the function arguments from the Functions sheet, and enter or copy and paste the input data. Each data range may be placed in any convenient position. For the ConbeamU function the required data ranges are:
- Segments: details of each beam segment with different section properties, with distance of the segment end from the start (left hand end) of the beam, flexural stiffness (EI), and optionally shear stiffness (GA).
- Outpoints: a single column with either the number of output sections for each span, or a list of output point positions (see below for more details).
- Supports: position of each support, with optionally translational stiffness, rotational stiffness, and displacement.
- Dloads: extent and magnitude of distributed transverse loads.
- PLoads: location and magnitude of point transverse loads and moments.
- OutUnits: single row with units for output results: position, shear force, bending moment, slope (leave blank), and deflection.
- Out: output index, optional, default = 1 (output as listed above).
- ListOutPoints, optional, default = False, output at specified number of sections/span. See below for details of True option.
Note that for the ConBeamU function (and other unit aware functions) all data ranges with values that have a unit must be headed by a valid unit symbol: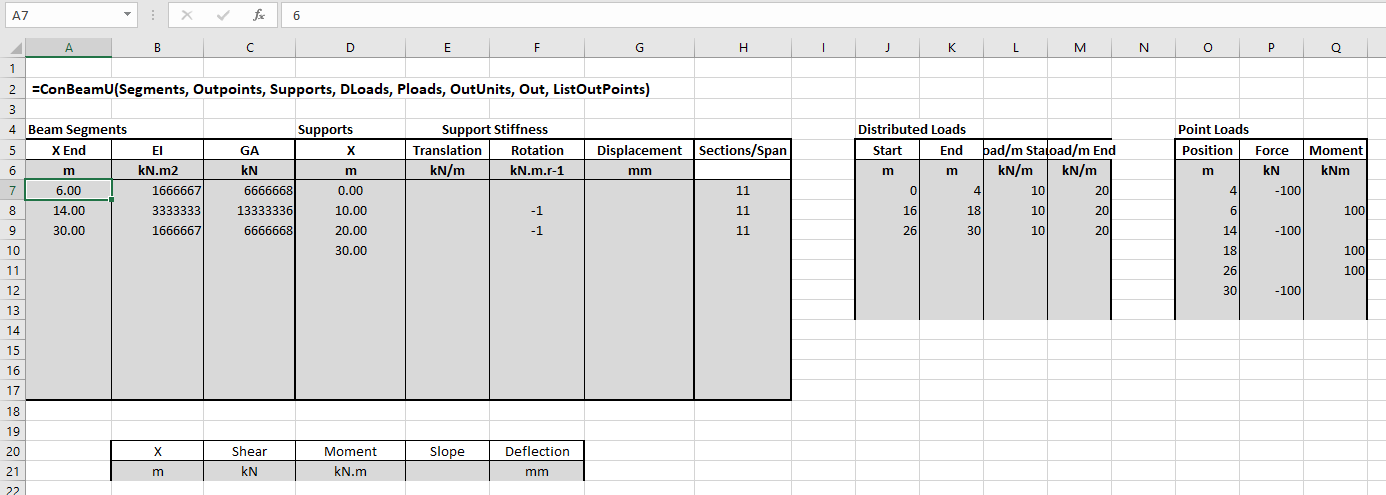
After entering all required input data, enter the function in the top-left cell of the output range. The easiest way to ensure that all arguments are provided, in the right order, is to enter the function name, including the opening bracket, then click the “insert function” button, just to the left of the edit bar, as shown below
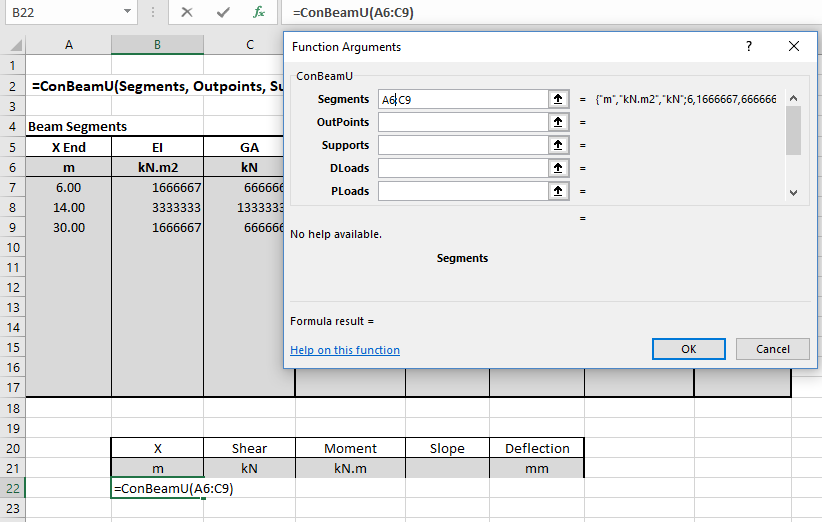
As each function argument is selected the contents of the cell or range are shown to the right of the data box. When all the required arguments are selected the function results appear under the data boxes. In this example the default values are what we want for the two optional arguments, so we can leave them blank. Click OK or press enter to enter the function:
At this stage only the first value of the results array is visible:
The standard Excel way to display all the contents of an array function is:
- Select the required output range, with the array function in the top-left corner.
- Press F2 (edit).
- Press Ctrl-Shift-Enter
However the ConbeamU spreadsheet has a macro that will do this automatically, so with the cell containing the entered function still selected, just press Ctrl-Shift-S.

The default output option is to specify the number of output sections for each span. An alternative is to list the position of each section where output is required. In the example below two points are entered at each internal support, and each point with a point load or moment. To display the output set the final “ListOutPoints” argument to True, and select the list of locations range as the “OutPoints” argument. Having edited the function, press Ctrl-Shift-Enter to enter: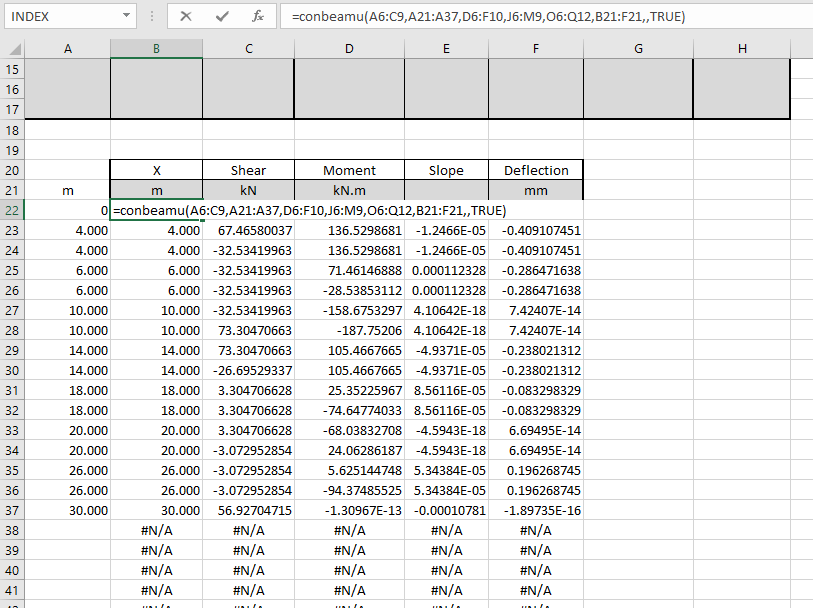
As before, to re-set the output range to display only the cells with valid output values, press Ctrl-Alt-S:
Note that the list of output point locations does not need to be adjacent to the output range, it can be anywhere in the workbook, or even in another workbook.
The procedures described above are applicable to any Excel function or UDF that returns an array function, except that resetting the output range to display the whole array by pressing Ctrl-Shift-S only works in those workbooks where the required macro has been added.

Pingback: #Excel Super Links #151 | Excel For You
Pingback: Year 10 Report | Newton Excel Bach, not (just) an Excel Blog